前言
原本公司有一個dev環境
最近需要額外再開一個stage環境給同仁測試
k8s集群需要和dev環境分開了
所以需要另外再建一個新的集群
趁這次機會把建立的步驟記錄下來以免以後忘記😆
建立環境
預計會在GCP上建立VM並部屬k8s集群
以下是部屬資訊:
k8s-master:
- OS: Ubuntu 20.04.6 LTS
- CPU: 2C
- MEMORY: 4G
- DISK: 20G SSD
k8s-node-1:
- OS: Ubuntu 20.04.6 LTS
- CPU: 2C
- MEMORY: 4G
- DISK: 20G SSD
node數量和配置可再依照需求自行調配
Server配置(Master,Node)
首先需要設定所有server1
2
3
4
5
6
7
8
9cat <<EOF > /etc/sysctl.d/k8s.conf
net.bridge.bridge-nf-call-ip6tables = 1
net.bridge.bridge-nf-call-iptables = 1
EOF
sysctl --system
modprobe br_netfilter
lsmod | grep br_netfilter
將指令貼到VM上,如下圖:
host設定(Master,Node)
設定每台VM的IP-hostname映射
我的兩台VM private IP分別為以下
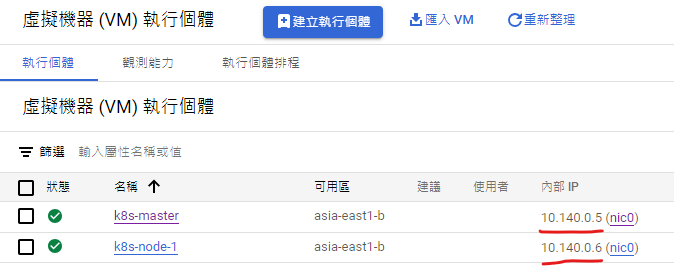
將private ip 分別指定到對應hostname
步驟如下:1
vim /etc/hosts
將 IP-hostname 貼到兩台的/etc/hosts上

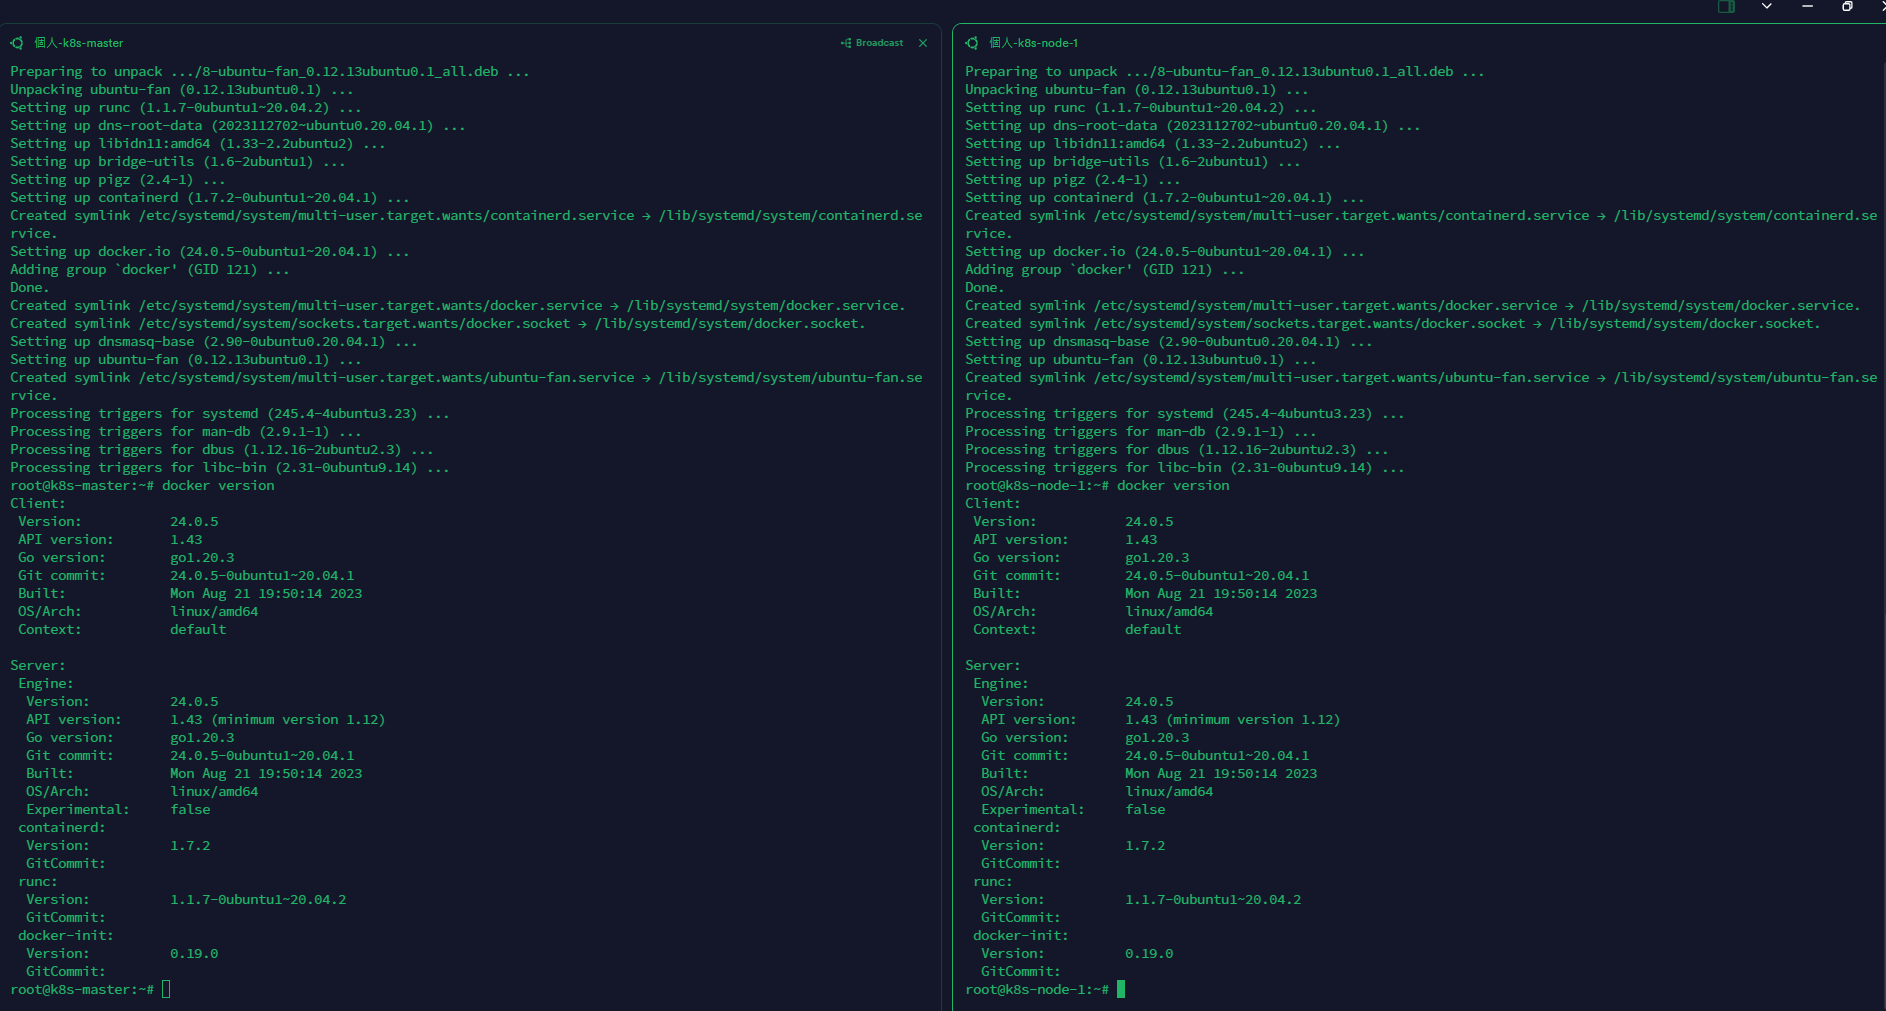
安裝docker、kubelet、kubeadm、kubectl(Master,Node)
先更新軟體包列表
1 | apt update |
關閉swap功能(k8s禁止使用)
1 | swapoff -a |
vim /etc/fstab
如果有swapfile相關字樣,則將該行註解,沒有則繼續

安裝docker.io
1 | apt install -y docker.io |
安裝完畢後 執行docker version有跑出資訊即可
安裝kubelet、kubeadm、kubectl
這次安裝的kubelet、kubeadm、kubectl版本皆為: 1.26.5-1.1
依序執行以下安裝步驟:1
apt update && apt install -y apt-transport-https curl
1
echo "deb [signed-by=/etc/apt/keyrings/kubernetes-apt-keyring.gpg] https://pkgs.k8s.io/core:/stable:/v1.26/deb/ /" | sudo tee /etc/apt/sources.list.d/kubernetes.list
1
mkdir /etc/apt/keyrings
1
curl -fsSL https://pkgs.k8s.io/core:/stable:/v1.26/deb/Release.key | sudo gpg --dearmor -o /etc/apt/keyrings/kubernetes-apt-keyring.gpg
1
apt update
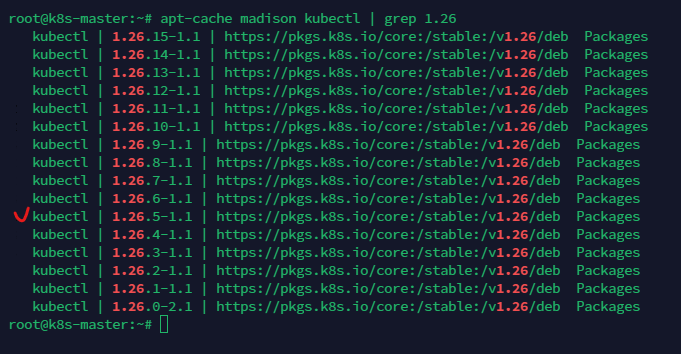
確認kubectl版本是否已存在於本地1
apt-cache madison kubectl | grep 1.26
安裝kubelet、kubeadm、kubectl1
2APT_K8S_VERSION=1.26.5-1.1
apt install -y kubelet=$APT_K8S_VERSION kubeadm=$APT_K8S_VERSION kubectl=$APT_K8S_VERSION
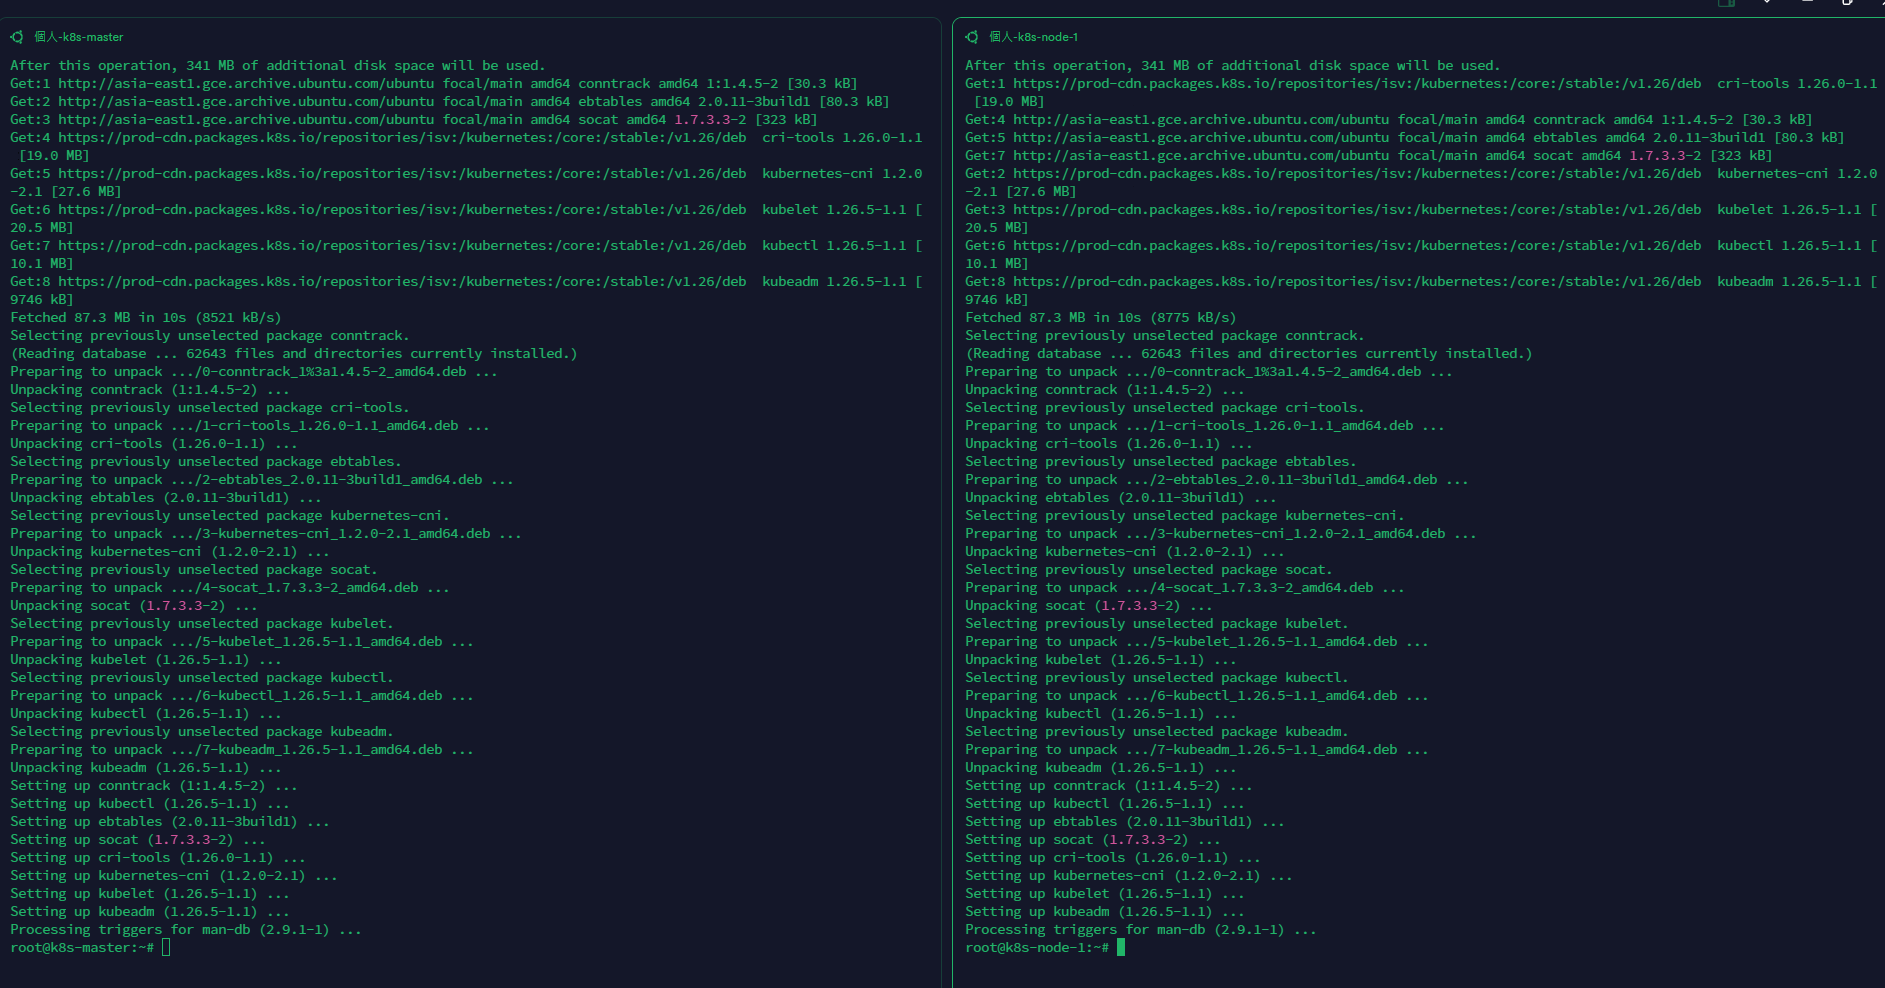
到這個步驟後如果沒有抱錯,kubelet、kubeadm、kubectl就安裝完成了
安裝k8s集群(Master)
透過kubeadm建立k8s集群1
kubeadm init --pod-network-cidr=192.168.0.0/16 --kubernetes-version=1.26.5 --apiserver-advertise-address=10.140.0.5
這邊要注意apiserver-advertise-address的IP要填入master的private IP喔!
看到以下畫面代表集群建立完成,最後一行的”kubeadm join ….”要記得保存起來,待會將node加入集群時需要用到
建立完成後依照系統指示輸入以下三行:1
2
3mkdir -p $HOME/.kube
sudo cp -i /etc/kubernetes/admin.conf $HOME/.kube/config
sudo chown $(id -u):$(id -g) $HOME/.kube/config
安裝CNI(Master)
CNI為集群的網路接口
這次使用的CNI為calico
依照下列指令安裝即可:1
CALICO_VERSION=v3.25.1
1
kubectl create -f https://raw.githubusercontent.com/projectcalico/calico/$CALICO_VERSION/manifests/tigera-operator.yaml
下載calico的yml檔1
wget https://raw.githubusercontent.com/projectcalico/calico/$CALICO_VERSION/manifests/custom-resources.yaml
下載下來後,將custom-resources.yaml的內容改為以下:1
2
3
4
5
6
7
8
9
10
11
12
13
14
15
16
17
18
19
20
21
22
23
24
25
26
27# This section includes base Calico installation configuration.
# For more information, see: https://projectcalico.docs.tigera.io/master/reference/installation/api#operator.tigera.io/v1.Installation
apiVersion: operator.tigera.io/v1
kind: Installation
metadata:
name: default
spec:
# Configures Calico networking.
calicoNetwork:
# Note: The ipPools section cannot be modified post-install.
ipPools:
- blockSize: 26
cidr: 192.168.0.0/16
encapsulation: IPIP
nodeSelector: all()
nodeAddressAutodetectionV4:
interface: ens*
---
# This section configures the Calico API server.
# For more information, see: https://projectcalico.docs.tigera.io/master/reference/installation/api#operator.tigera.io/v1.APIServer
apiVersion: operator.tigera.io/v1
kind: APIServer
metadata:
name: default
spec: {}
注意!
spec.calicoNetwork.nodeAddressAutodetectionV4.interface 如果是GCP,網路介面通常會是ens開頭,設定前請再次確認是ens還是eth(可以透過ifconfig查看)
調整完後執行以下指令:1
kubectl create -f custom-resources.yaml
將node加入集群(Node)
將剛才的kubeadm join 指令貼到node VM上執行
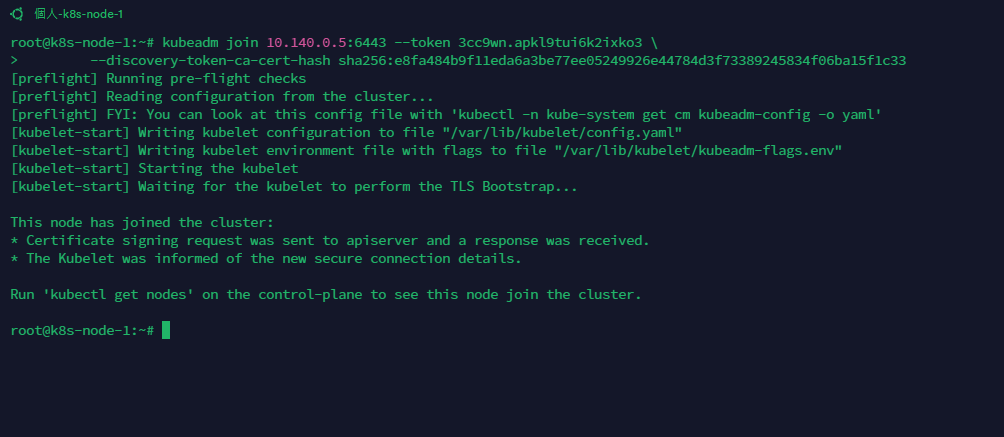
完成後,回到Master節點上確認node是否有成功加入集群1
kubectl get nodes
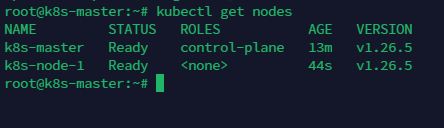
節點狀態皆為Ready代表成功加入
調整nodePort 默認port範圍(Master)
k8s的nodePort默認是30000-32768
代表預設最多只能透過nodePort建立2768個service
因此我們需要擴大port的範圍1
vim /etc/kubernetes/manifests/kube-apiserver.yaml
在spec.containers.command添加底下這行:1
- --service-node-port-range=1-65535
如下圖:

儲存後重啟kubelet1
systemctl restart kubelet
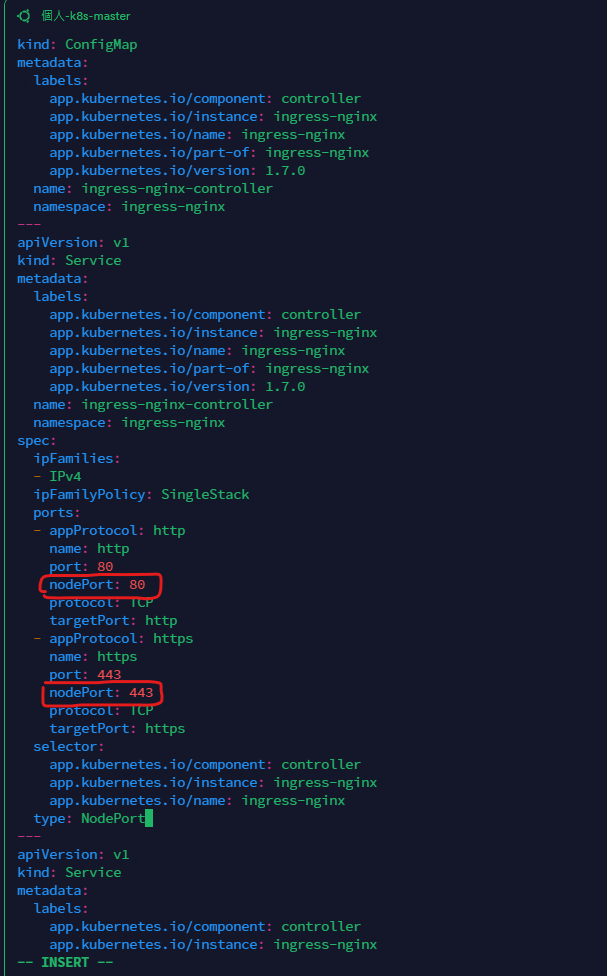
安裝ingress-nginx服務(Master)
先下載ingress-nginx的yaml檔1
wget https://raw.githubusercontent.com/kubernetes/ingress-nginx/controller-v1.7.0/deploy/static/provider/baremetal/deploy.yaml
下載下來後需要調整兩個地方,大約在350行附近
請加上nodePort: 80以及nodePort: 443
如下圖:
修改儲存後執行1
kubectl apply -f deploy.yaml
安裝完成後確認目前所有的pod的狀態1
kubectl get pods --all-namespaces
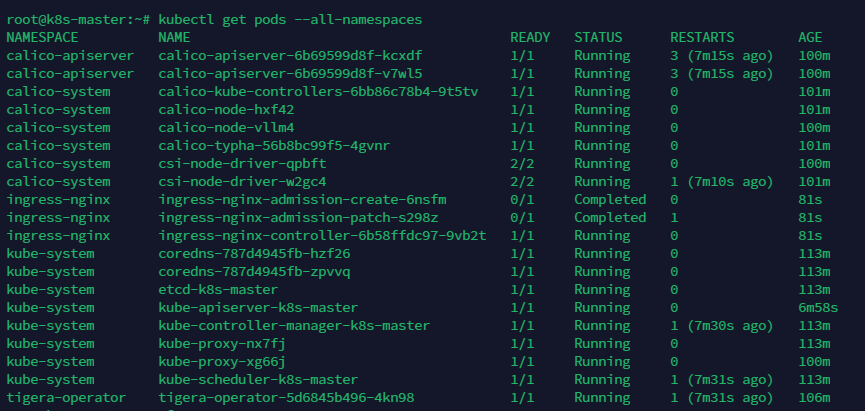
狀態皆為running或是Completed即可
到此集群就算建立完成啦🎉
注意
AWS或是GCP上的防火牆開放針對內網所有的port號(0-65535)
以GCP來說
如果雲開給你的內網網段是10.140.x.x開頭,那就需要在網路安全性 => 防火牆政策上新建一條防火牆規則
如下圖:

如果沒開,會有很多service會有問題,例如ingress-nginx、metrics-server等等